Original topic:

Tip - Photo Editing | Post Editing 📸

(Topic created on: 10-01-2019 02:31 PM)
636 Views
ZMAHD
Options
Tip

Hey! 

 
Welcome back to my last photography "lesson" for this three parts series. You've made it to my favourite step, post editing! This is my favourite because this is where you make the photo truly your own. I'm going to be using Adobe Lightroom Mobile for this as the free version is very versatile and easy to use, but you can use other applications like VSCO or Snapseed. Also, remember if you shot your photo in RAW, your edits here are going to look 100x better! Let's get started!
 
 
🔵 Introduction
🔵Camera
Post Editing
 
Post Composition
Before we get started with the actual edits, it's important to recheck your composition or fix it if you couldn't do it when taking the picture. Once you opened the photo in Lightroom and have opened up the editor, go to the Grid Adjustment.
 
image
 
Once here, you can change the aspect ratio of the image and straighten it out. I usually straighten my image using the auto straighten tool, but you can also do this manually. Since all my pictures are uploaded to Instagram, I choose the 4:5 aspect ratio so it fits perfectly within the app. Here's a before and after:
 
image


image
 
Basic Adjustments (LIGHT)
Once you are happy, let's get to the basic Adjustments. In the "LIGHT" tab, you can adjust things like exposure, contrast, etc. This tab is important to correct the lighting of your photo, feel free to experiment with things like the contrast and highlights, but try not to go overboard since it will result in the photo looking over-processed. Now let's talk about Curves!
 
image
 
Curve Adjustment (Tone Curve)
This is my favourite tool in the Lights tab as you can really see a dramatic difference in quality when using this tool. A tone curve controls the shadows, highlights and mid-tones here is what it looks like (without the text obviously)
 
image
 
You drag that diagonal line to bring up or down those adjustments. For my image, I used the "S" pattern which brings up the highlights and the shadows. At the very end where the line starts (left side), if you drag it up from the corner, you get what's called a Fade, and it really adds an artistic appeal to the final photo.
 
image
 
Colour Adjustments Pt. 1 - Basic Adjustments
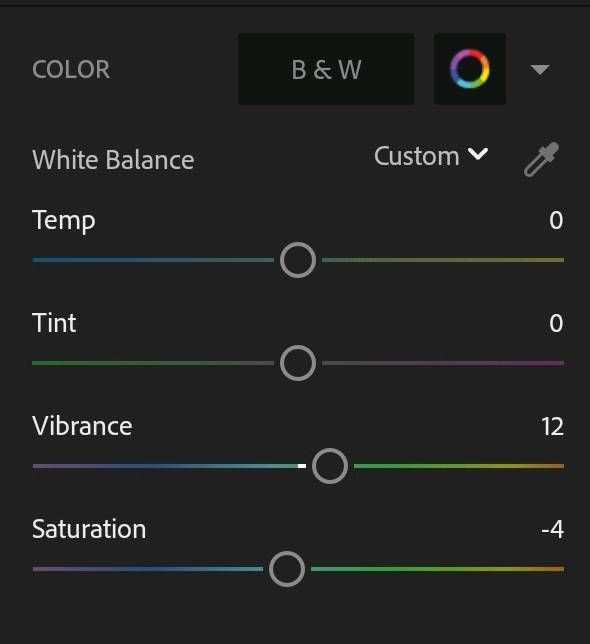
Arguably the most important tab in my opinion, this is where you can really change up the image and make it truly your own! We're going to be starting with the basic colour Adjustments like temperature which determines how warm or cold the photo looks, in other words, it adjusts the blue and orange tones of the image. The tint is very similar adjusting the red and green tones. Saturation controls how saturated the colors are, this can really add a pop to your image, but try not to go overboard since oversaturation results in a bad look for the image. Vibrance is very similar increasing the saturation of muted colors without  saturating skin tones and already saturated colors. 
 
image
 
 
Colour Adjustment Pt. 2 - HSL Adjustments
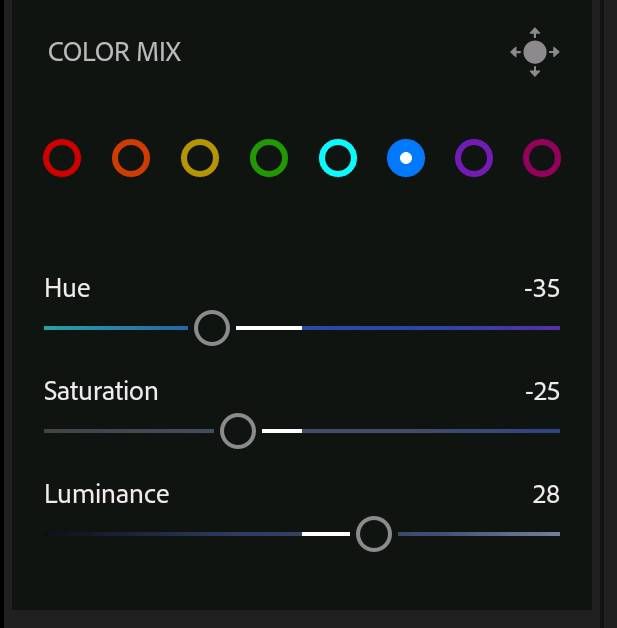
This is really where the magic happens, HSL stands for Hue, Saturation, Luminesce and this is where you can alter the actual colours of your photos. To go into the HSL tab, click the rainbow circle beside the B & W button.
 
Then we get to really experiment!
 
image
 
Here's where you can really show your personality. Click on each of the 8 colour circles to edit it's HSL values for your image. Hue adjusts the actual colour itself, so when I wanted to change the sky to a cyan colour, I dragged the Hue slider in the Blue section to that colour. Saturation is same saturation we talked about earlier, but here it's specific to that Hue. Finally, Luminesce changes the brightness of that colour. With all of these colours and Adjustments, you can really alter the image to the way you want it to look, just remember to not over do it since it can very quickly look over-processed and fake.
 
Effects
This tab help make the image look better overall, you have tools like Clarity and Dehaze which help remove the fogginess from the image which gives it a cleaner look and feel. The Texture tool is pretty self explanatory helping bring out the Texture from certain subjects within your photo. Vignetting is when the lens of your camera covers the sensor resulting in a round border around your photo. This tool fakes that effect, and it's really just a matter of taste whether or not you want to use it. Finally, Grain is an effect that simulates artifacting for your image, which makes the image look old and dated, this effect is also a matter of taste. 
 
image


Detail

This tab controls the amount of sharpening on the image, it's pretty self explanatory, but I do want to go over a few things. First is Noise Reduction, this tool removes the Noise an image has which is the little blotches or artifacts that remain. Colour Noise Reduction does the same thing, but for the HSL Adjustments. This tab doesn't really need too much work unless you have a lower resolution photo, but let's be honest, you have a Galaxy device, you're going to achieve some of the sharpest images around!
 
Optics
This tab corrects the lens calibration of the photo which results in a better looking image. This is one of the reasons to shoot in RAW since that image format tells Lightroom which camera you're shooting with and the calibration is flawless. Also, I usually toggle the Chromatic Lens Aberration off since that's only when the lens fails to focus all the colours to one point, and that rarely if at all happens.
 
image
 
 
Additional Notes
 
So these are the steps I take to make my photos look 100x better. Lightroom Mobile has many more features like Presets, Colour Profiles that I didn't cover, but that's where the fun is. Experimentation of these tools and features is what helped me level up my photography game! I hope to see all of you using these tips the next time you take a photo. 
 
That's it! Thanks for Reading this series!


29 Comments
Tip
Lightroom Mobile is available for all phones! I used my Tab S3 since it has a bigger canvas!
0 Likes
Decoeur
Active Level 2
Tip
when will u b starting ur nexþ session?
0 Likes
mackymoocow
Beginner Level 2
Tip
cool
0 Likes
Tip
Cool
0 Likes
Shangxue
Beginner Level 3
Tip
thanks
0 Likes
AshAmBe12
Beginner Level 2
Tip
thank you so much for sharing this knowledge with us. are there any links to the other 2 posts in your series? I'm dying to read the rest
0 Likes
lenny12
Beginner Level 2
Tip
nice..thanks
0 Likes
SurbS
Beginner Level 3
Tip
This is awesome, thanks for the tips!
0 Likes
Mantini
Beginner Level 2
Tip
Nice CN tower shot! my favourite to take pics of
0 Likes
Decoeur
Active Level 2
Tip
absolutely beautiful! I love the ways you worked with the purple!
Amazing work my
friend.
0 Likes